Make This Easy Christmas Bow Wreath!
Gorgeous wreaths can be simple to make if you follow a few steps. Try this easy Christmas bow wreath tutorial to create your own beautiful Yultide!
Wreaths are such a fun way to display your personality. Almost anything can be used to create a hanging seasonal work of art. Everyone loves a beautiful wreath and today you will find a whole slew of them! I am looking forward to sharing my easy Christmas bow wreath with you. It’s one of those projects you can turn on the Hallmark channel, grab your cocoa and play.

If you are new to The Aspiring Home, I am so glad you are here! Welcome to the 5th annual 12 Days of Holiday Ideas event, hosted by Shirley of Intelligent Domestications and Erlene of My Pinterventures Between Nov. 11th and December 6th there will be hundreds of new ideas shared by over 55 Co-host bloggers!
Go here to see our kick-off collection of Holiday ideas as well as all of this years talented participating DIY and Foodie Blogs. Download this years November and December calendars with all of the topics and dates so you can make plans to watch for ideas!
We are hosting a BIG GIVEAWAY from our Sponsors this year! Be sure to scroll all the way down for more information and to enter to win!
Ok! Let’s get start at the beginning, a very good place to start.
Supplies:
- Scissors
Pipe cleaners, ahem Chenille Stems- Wire Wreath frame
- Assorted coordinating ribbon – your choice
- Decorative items
- Hot glue gun
- Hot glue
- Stapler

Step 1- Let’s make ribbon loops!
I have said it before – if you can make a loop and pinch the middle – you can make a bow. This wreath idea is basically lots of bows tucked close together. Let’s cut our ribbon into 16 in. strips. Make a circle with the ribbon and secure. In the post on How to wrap gifts beautifully, I used tape to secure. Another option is using as stapler.
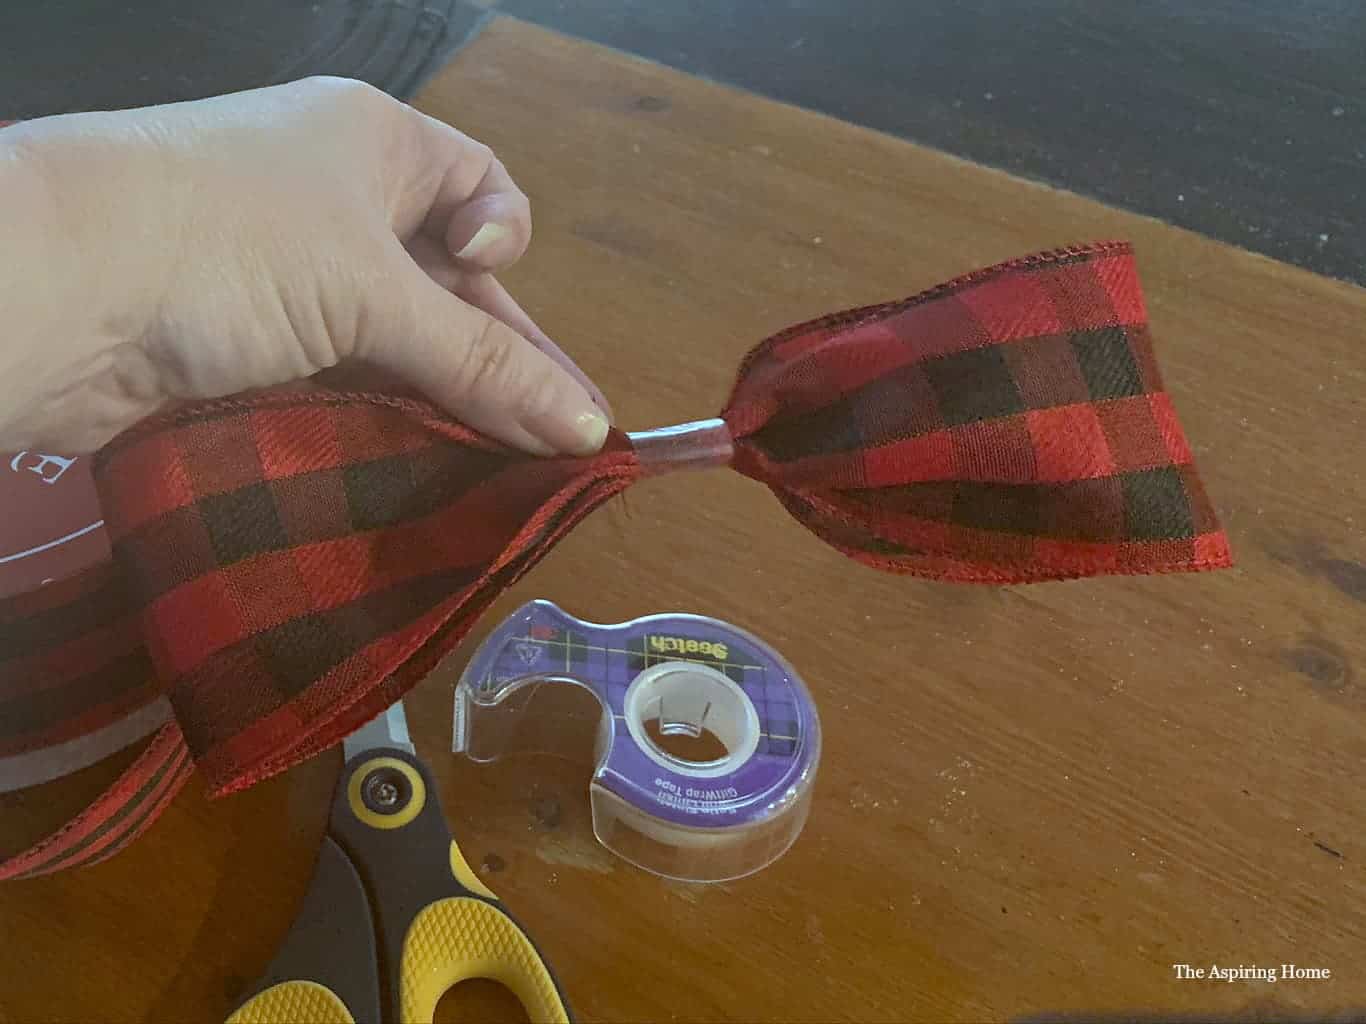
Step 2 – Pinch and layer
Now that we have tons of loops, let’s start creating bows. Take your loop and pinch the middle if you used tape- skip this step. If you used a stapler, ya gotta pinch and use a chenille stem to secure (cut your stems in half).
Begin laying 3 loops in a criss-cross pattern. Use a chenille stem to hold the 3 loops together. This will create a simple bow.
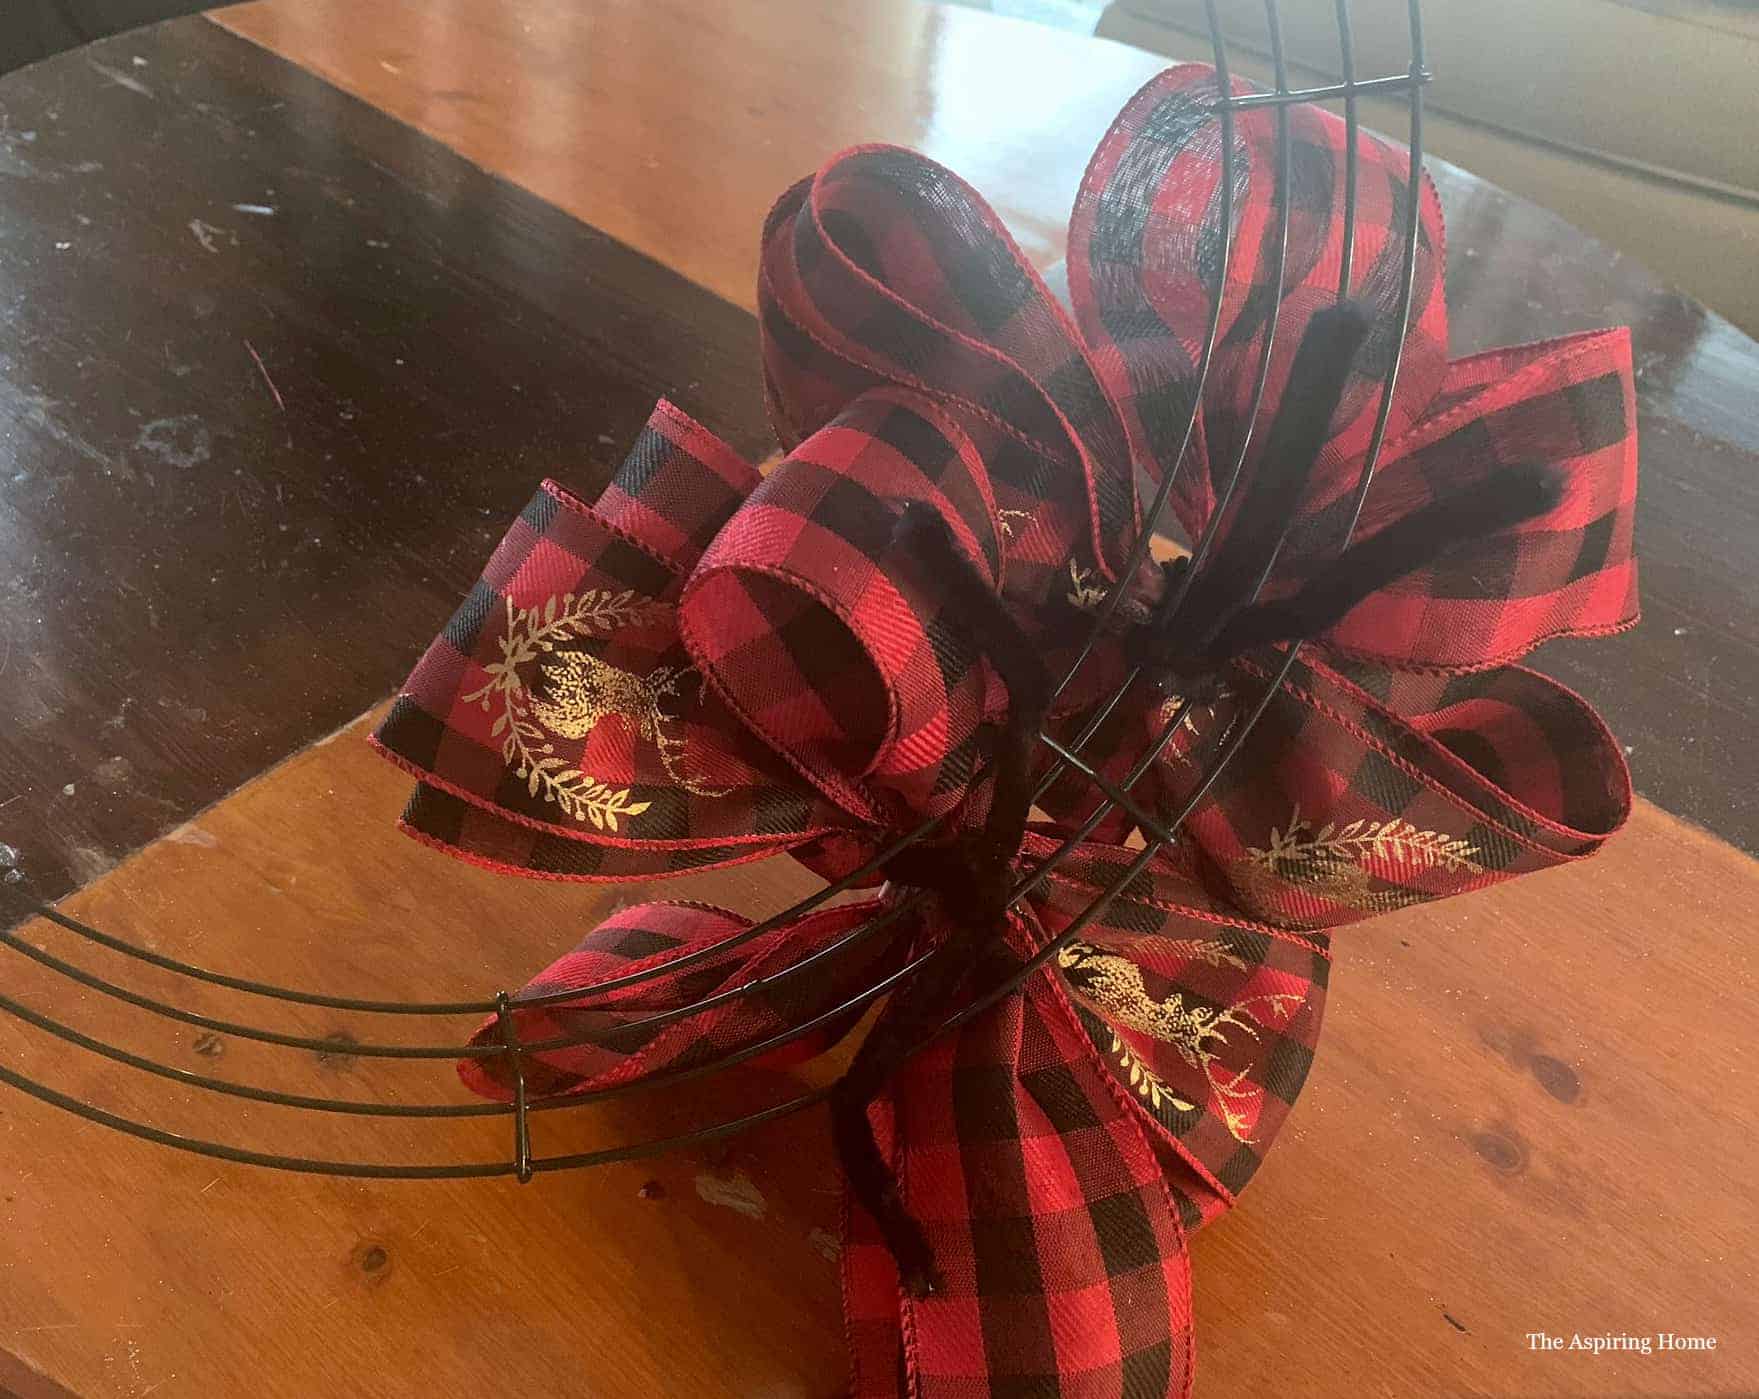
Step 3 – Create the wreath
Take the bows and secure them to the wire wreath frame. Use the two middle rings to attach the bows to the frame. Continue this step until the wire frame is full and fluffy.
Find more wreath and swag ideas HERE.
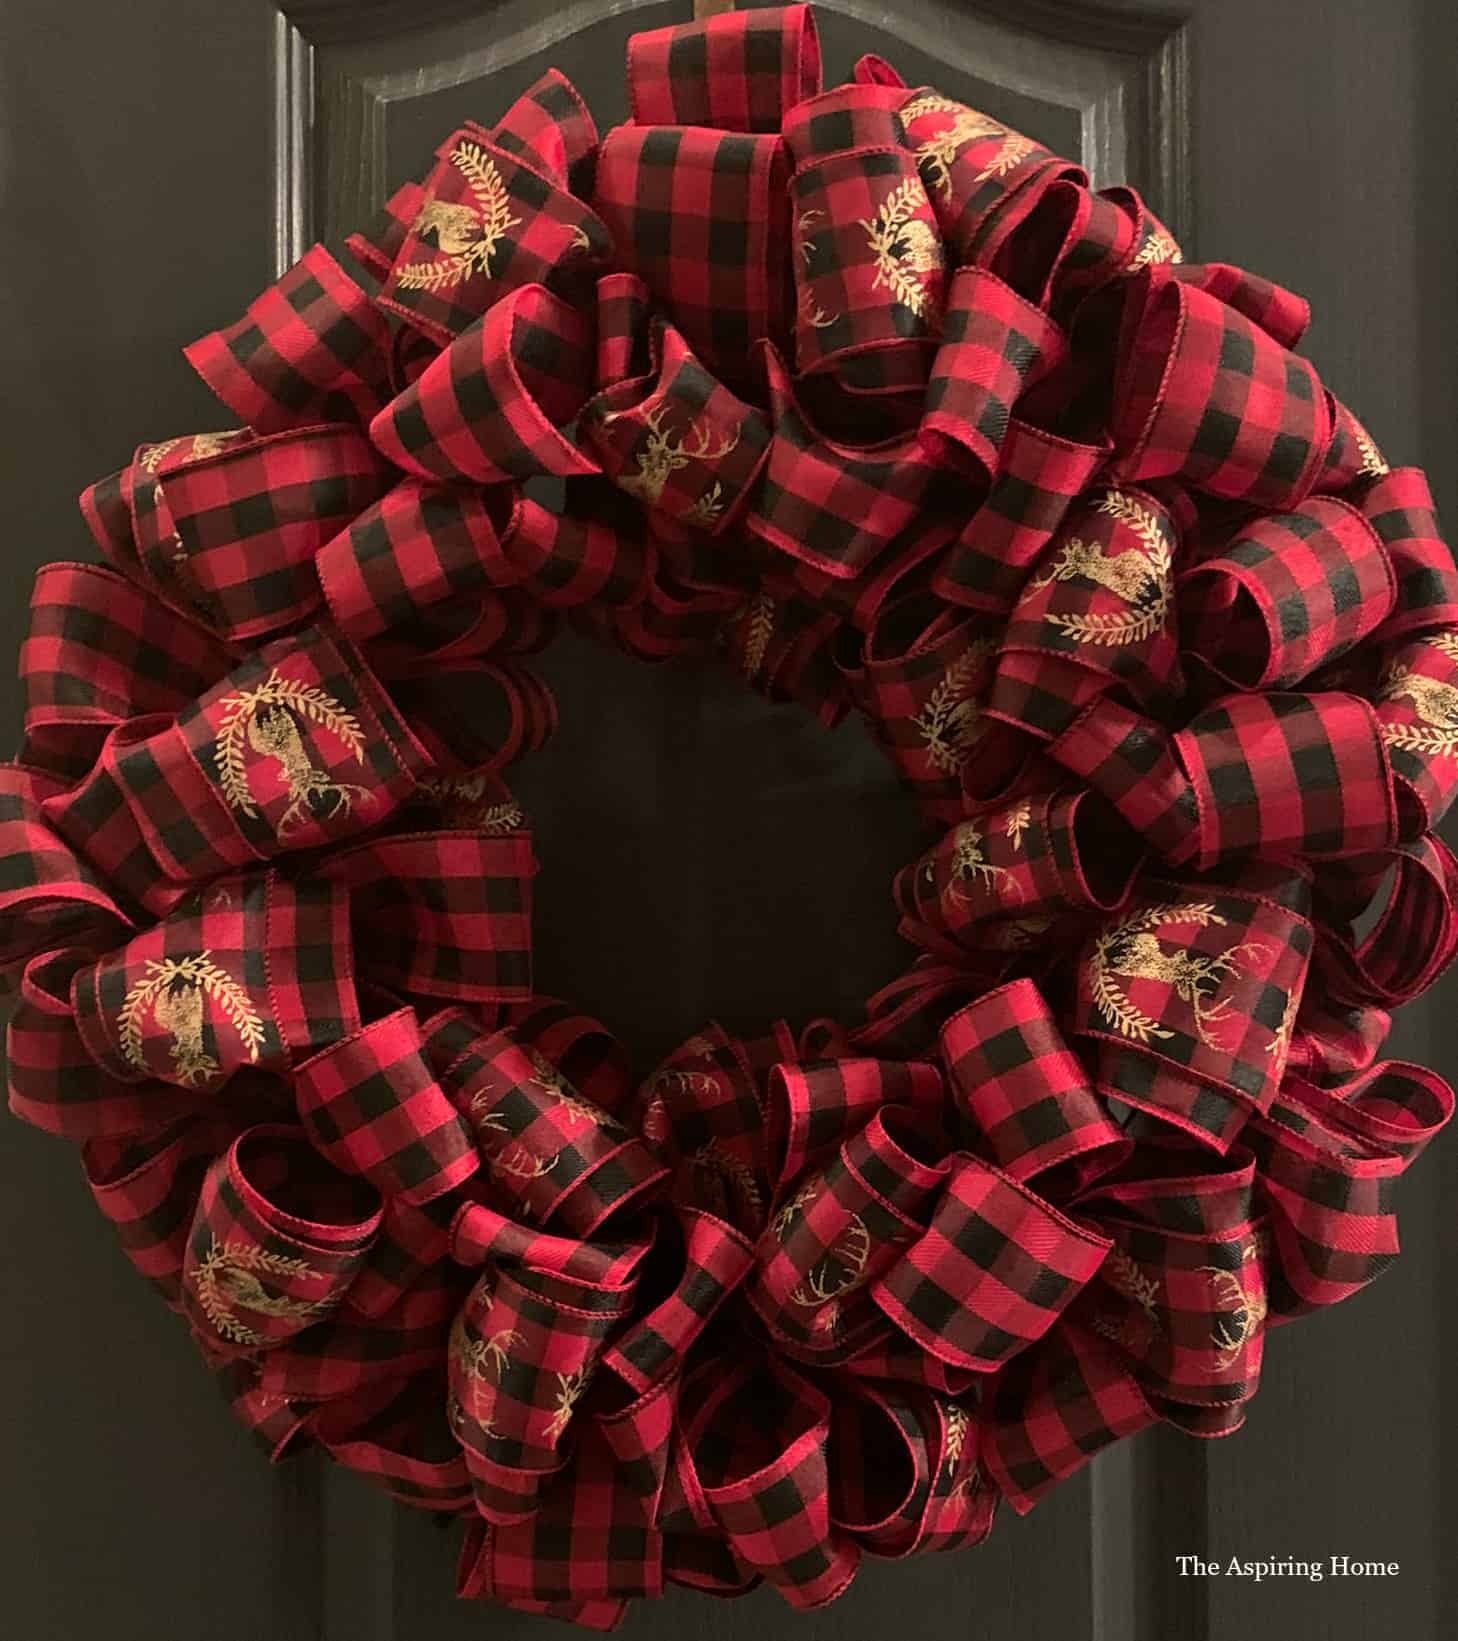
Step 4 – Add the extras
The wreath will be lovely on its own but adding a little “Merry Christmas” to it is always appropriate.


MEET OUR SPONSORS who have generously donated fabulous prizes for the Big Christmas Giveaway!
DecoArt winner will receive a prize package valued at $100!
Dixie Crystals/Imperial Sugar winner will receive a Keurig Coffee Maker valued at $100!
Oriental Trading winner will receive an OrientalTrading.com gift card valued at $200!
Cabot Cheese winner will receive a gift basket of Cabot products valued at $75!
Burlap Fabric winner will receive a prize pack of products valued at $50!
It’s Home To You winner will receive one wooden Santa sign valued at $65

The giveaway begins Nov. 8, 2019, and ends Dec. 6, 2019. Winners will be notified by December 13, 2019. Sponsors will ship each prize to the winner. There will be a total of six winners, one for each prize. Drawing is by random selection using the Rafflecopter widget.
Must be 18 to win. Open to U.S. residents only. Terms & Conditions
Please make sure you enter the giveaway!
So now that you have seen my little tutorial, you have to see all the wonderful creations my friends have offered this year!

Joy Maier is the founder and principal designer of The Aspiring Home Interiors, an award-winning studio serving the greater Dallas area and beyond. Blending gracious living with elevated design expertise, Joy creates interiors that feel deeply personal, beautifully refined, and effortlessly livable — from full-home renovations to boutique vacation rentals. Her professional affiliations include ASID (Associate), ART, the Interior Design Society (Professional), NKBA, VRD Collective, and she is a founding member of Designers for Dogs. Since 2012, she has shared design tips and heartfelt stories on The Aspiring Home Blog. Her philosophy is simple: “Design should feel like a deep breath. When we get it right, your home greets you with that exhale every single day.”
I love the idea of making all the bows and then attaching them to the wreath form instead of weaving in and out. Your wreath is gorgeous!
I’ve incorporated red & black buffalo check into my holiday decor this year and so I’m swooning over your wreath. The gold-painted wood sentiment in the middle is a nice touch! Pinned 🙂
I love buffalo check and this wreath is so pretty. I love crafting and watching Hallmark.
Your instructions made me laugh with the “ahem, chenille stems.” Very beautiful wreath!
Falling hard for your beautiful wreath. That ribbon is wonderful with the little gold deer on it!
I’ve never seen it done this way before. I might actually be able to do this one! It’s beautiful!
Beautiful! It’s so full and pretty!
I love the red check ribbon with the gold deer embossed on it! It made a really pretty wreath.